Sunday, December 20, 2009

Hot Chocolate Anyone?


Wow is this a crazy time of year or what?! I will freely admit that I have not been well organized (starting my Christmas cards in December for example), but man I swear I feel like I am barely staying afloat! I am getting lots done (and I have recorded it), but popping in here to show off has been very low on the priority list. Hoping that things have settled down here now: Christmas cards made and sent, cookies baked, teacher gifts made and given out, presents bought and almost all wrapped, some handmade gifts made and a few more to make. Now I am trying to get ready for hosting Christmas Eve and New Year's Eve...ahhh!

Anyway, the reason I am here is to show you a cool little gift that I made for my son's classmates for Christmas. Now I take absolutely no credit for the recipe or idea. I saw a blog entry from an amazing Mom, Amy, at The Idea Room (btw, if you want a place to get awesome ideas to do with the kids, get organized, etc, you NEED to follow her blog...how she does it I will never know, but I have gotten many awesome ideas from her!) for Hot Chocolate on a Stick. She got the idea from a fellow blogger, Amber, at the Giver's Log. Amber gives great instructions, so I will not repeat them here. I will say that I used Ghirardelli Baking Bars and I had a big difference in consistency turnout between the Semi-Sweet vs. Milk Chocolate. I have no idea why, but just thought I would note that, although it tasted great either way!


I made them and then put them in bags with some ribbon and a note for instructions. I decorated them very simply, mainly because I was short on time, but also because they were going to 4 year olds! But overall I thought they turned out cute...and let me tell you they are good! Just writing about them, makes me want one!! And just to give you the full effect of 22 yummy Hot Chocolate on a Sticks:


Now go make your own!!!

Tuesday, July 7, 2009

Oh My Goodness and a Road Trip

So I may use a little space here as a little therapy session...if you would rather not hear me whine, skip down to the next paragraph. Still here...oh thanks! Let me start by saying I love my baby girl so very much...have to remind myself of that sometimes especially on days like these! So she seriously needs to start talking already...she is 13.5 months old now and all we really get are "doggie", maybe "duck", maybe "car", and a lot of mamamamamama (which may or may not relate to me!). The reason I say this is because the poor thing has no way of communicating with me besides screaming! Problem is all of the screams sound the same...LOUD! I have tried and am still trying signing with her, but she does not seem to get it nor has she ever attempted to show me a sign. I got to the point today I yelled at her to stop, which startled her, then she did stop screaming (yeah!), but then started crying (which is close to screaming!). Ahhhh, I just want her to start talking, signing, or something so that we can communicate better with each other! My son was an early talker, so I didn't have this issue with him....I am so struggling right now! Ok enough of my therapy session...on to the subject at hand.

First for my "Oh My Goodness" portion of the title of today's post. I got some very exciting news recently! Spellbinder's (the makers of the Nestabilities) blog had a Blog Frenzy last week to showcase their new Pendants and Borderabilities (all of which are very cool!) and you could enter each day to have a chance to win that days Pendant and matching Borderabilities...and if you entered all of the days, you had a chance to win the Grand Prize of all of the new Pendants and Borderabilities. Well guess what....I WON the GRAND PRIZE! Check out all of the cool stuff I won HERE! It is so exciting to see my name as the winner...I just couldn't (and still can't) believe it!

Now for the Road Trip portion of the post...my family is headed on a trip this weekend to southern Ohio. This will be the longest trip I think we have taken with the kids, so I have been trying to come up with ideas to keep Eli (Adi is too young for all of this) entertained without too many DVD's and such. Allison Fillo was kind enough to send me a link to a Road Trip game that you try and count up the number of each vehicle you see. So I took that idea and made it into a Road Trip BINGO. So as we are driving along, we will play BINGO with the things we see. It sounds like it should be fun...I will let you know how it goes when we get back!

Thanks for checking out my kind of engineering!

Friday, February 8, 2008

Valentine Gifts

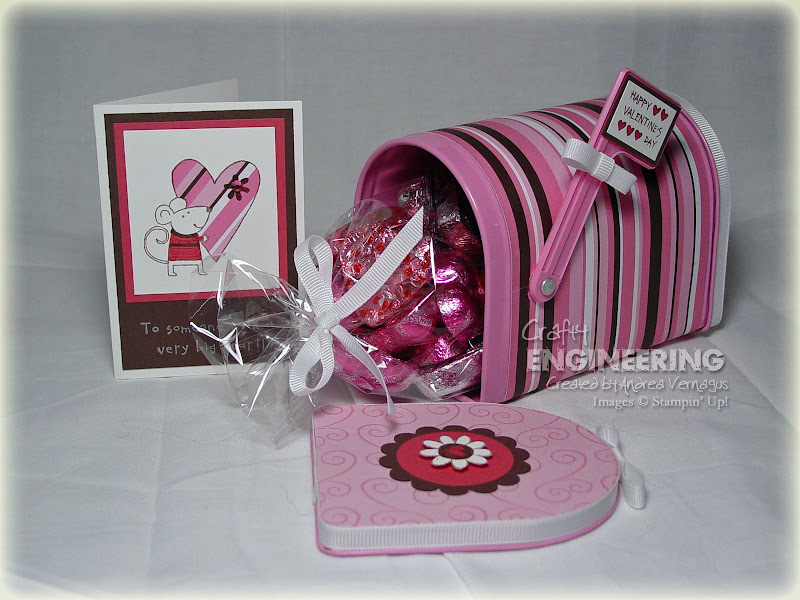
In addition to the Valentine’s Day cards for the kids at my son’s daycare, I wanted to make some little gifts to give to the girls that care for my son…he loves them so much and they are so wonderful to him! I have seen all over in blogging land, the Target $1 mailboxes that are out for Valentine’s Day. So I headed over and picked up a bunch and also hit Jo-Ann’s to find some Valentine’s Day patterned paper.

The mailboxes are really cute and very easy to cover. I used a 4” x 12” strip of patterned paper to cover the main body of the mailbox and I adhered it using sticky tape. My only tricky part was to punch a hole for the flag…I read before that a ½” circle punch works great for that, but alas I do not have one. So I used a ¼” circle punch and just tried to “make” a ½” circle. Not the prettiest, but I think it worked with out being noticeable. Then just traced the lids of the mailbox onto another sheet of patterned paper and adhered that using Modge Podge…although I think the Tombow Liquid Metal or Multi-purpose Adhesive would work better (but I don’t have any) because the paper could be easily peeled from the lid…just hoping it isn’t handled too much! Then I just decorated the edges of the lids with ribbon again adhered with sticky tape. The little bows were created via inspiration from Nichole Heady’s blog and her instructions here. It makes a nice clean inline bow for a strip of ribbon. I added a little extra decoration with some of the images from the Happy Heart Day stamp set, but I didn’t want to overwhelm the mailbox so I kept it simple.


Then, the best part…I filled it with chocolate and a matching little card. I used the mini note cards from Stampin’ Up! that I realized fit perfectly in the little mailbox. The image in the card is again from the Happy Heart Day set and I paper pieced the heart using the striped paper. Colored the shirt of the mouse and the flower on the heart with Rose red and Chocolate Chip markers. A little Rhinestone sticker (Icons Stickers by Me & My Big Ideas available at Jo-Anns) finished it off! Again kept them simple, but I thought it turned out cute. I hope they like them!

I made a second set with a little bit less girly colors to give to my husband and son. Similar matching card to finish it off...with candy of course!


The Engineering Details
Stamps – Happy Heart Day; Ink – Chocolate Chip, Rose Red Marker, Chocolate Chip Marker; Cardstock – Pink Striped (DCWV From Jo-Anns), Pink Swirl (Sandylion Sticker Designs From Jo-Anns), Rose Red, Chocolate Chip, Whisper White; Accessories – Scallop circle punch, 1-3/8” circle punch, white ¼” grosgrain ribbon, Target $1 Spot mailbox; Supplies – sticky tape, Modge Podge, scissors


Monday, January 14, 2008

Stamping on the Walls

So as you know I am expecting a second child in June. My husband and I decided that we would give our son a new room (all boy style) and leave the original gender neutral current room for the baby. It is funny though how my son’s current room, even though before he was born it felt fine for a girl or a boy, has taken on a boy feel to it…guess because he has been in there for almost 3 years now! Anyway, my little man is very into transportation vehicles of any kind and at one time he told me he wanted a blue room…although that changed on the day you asked. So I went about trying to figure what I wanted to do in there and found some great foam stamps at Michael’s. There was a bus, car, pickup truck, train, cement truck, and an airplane. My mom, the sewing goddess, and I set out to pick out material for a quilt that she would make incorporating these great shapes. I then took the colors from the quilt to get the colors for the room. So what do you think??


Oh and the cool “All Boy Blvd” sign on the wall is technically a rub-on (gotta love those rub-ons!) from Uppercase Living. My sister had a party and this is what I got…just fits perfectly in his room! It was super easy to put on the wall…I will admit though I was very nervous!!

Here are some close-ups of the stamping that I did. The stamping went really well. The images came out a little splotchy due to the slight texture on the wall. I wanted a slightly more solid look to the images though, so I had to fill in some patches by hand…the most time consuming part!


And finally, here is a preview of the beautiful quilt my wonderful mother is working on! I am still amazed at how great the vehicles turned out…cant wait to see the finished project!!

Now we just have to move my son’s bed and stuff in there and he has a brand spanking new “All Boy” room!

Related Posts Plugin for WordPress, Blogger...